Friday, September 30, 2011

Oh, How I Missed Thee, Oh Mighty Zoya Remove +

My post tittle might seem a little melodramatic, but I really have to emphasize how amazing this stuff is.

I have included Zoya's Remove + in a monthly favorite post as well as in my update for my Project 10 Pan #1. I said I was not going to repurchase this because it was a little more expensive than is normal for nail polish remover, but after going back to regular drugstore nail polish remover I realized how fabulous Remove + really is.

Shall we begin with the many PROS of this product?

-It comes in a super convenient pump dispenser.
This allows you to get only the amount of product you need. There is no risk of accidentally dumping out about 1/3 of the bottle because you being too careless (This has happened to me vaaaarious times).
-The liquid is purple.
My favorite color is purple. Enough said.
-This actually has a somewhat pleasant smell.
Unlike most nail polish removers, this doesn't smell overly harsh. The smell reminds me of that really yummy zebra gum. Do you know what gum I am referring to? It came in a striped package, and the gum was also stripped. The gum wrapping has zebras that you could "tattoo" onto your tongue and the gum was really good, but the flavor only lasted like 10 seconds. Well it smells like that to me, only with a slight smell of nail polish remover.
-This removes nail polish so easily with hardly any effort. 
It even removes glitter fairly easy. I mean, I usually go through 2 or 3 remover drenched cotton pads to remove glitter polish, but with this I only use 1 cotton pad.
-Super gentle on the nails and the cuticles.
This is the most important of all. It does not make my nails brittle or weak, unlike many other removers.

I am not the only one who really loves this stuff. Many other beauty blogger adore this, including Christine from Temptalia. I really trust Christine's judgement because she is really picky and she can pick out the best of the best when it comes to beauty related products. If you use nail polish remover really often, then I really suggest you try this out. After using it once, I cannot go back to drugstore nail polish remover. It just simply does not compare at all. For $9.99, it is not super cheap but it is something I am willing to spend my money on because it really saves me time and effort when it comes to removing nail polish.


Thursday, September 29, 2011

EOTD: Neptune Star

Tip of the Day
I always get comments from people telling me that they like how I blend my eyeshadows. Sure, my technique isn't perfect, after all I am not a makeup artist. But, I think I do a decent job at blending. What is my secret? Having the perfect, fluffy, blending brush! Let your brush do all the work for you! I have tried my fair share of blending brushes, and the best one I have ever used is the MAC 217. I have even tried Sigma's dupe brush, but it wasn't the same. I highly recommend you invest in a good blending brush, because it will save you a lot of time and effort. I was very skeptical about buying the 217 (I think I bought mine about 1.5 years ago) and it was the first MAC brush I ever purchased. It is still in great shape after 1.5 years and I use it pretty much every single day. The 217 is also a great multi tasking brush; you can use it for various purposes. If I could only have one eye brush, it would definitely be the 217!~
------------------------------------------------------------------------------------------------------------------------------------------------------------------------------------------
Another EOTD? Yippie! This was the look I had on today because I was testing out this new eyeshadow. I have totally left behind my project 10 pan and bought 3 of the Revlon diamond lust shadows (They were on sale for $2.49ish!).

The Revlon diamond lust I will use today is the one in the color Neptune Star, which is such a fitting name.
Neptune Star is a blacked blue, with slight green undertones, and a lot of fine holographic glitter.

 *My camera freaked out with the amount of glitter Neptune Star had,so it didn't really capture the true beauty of the eyeshadow. It looks waaaay better in person.

Products Used
-Fyrinnae Pixie Epoxy
-Revlon diamond lust 'Neptune Star'
-MAC Jealousy Wakes
-MAC Hocus Pocus
-L'oreal Lineur Intense liquid liner
-Yanqina Volumizer mascara

How to Achieve this Look
1.If you are using the Revlon diamond lust, I recommend using a sticky base, or else the glitter won't show up.
2.Apply Neptune Star in the inner 1/3 of he lid. Pack on the color with a flat brush.
3. Apply MAC Jealousy Wakes, or any turquoise or green color, and pat it on the middle 1/3 of the lid.
4.Then, take MAC Hocus Pocus, or any dark brown, grey or black, and apply it on the outer 1/3 of the lid.
5.Make sure to blend the colors just slightly so there are no harsh lines.
6.Apply Hocus Pocus on the lower lash line. 
7.Apply liquid liner and mascara.


I wanted to make this look a little murky and mysterious. I feel that adding the brownish dark gray color makes it look like murky water, adding a little depth and adding emphasis to the sparkle in the inner corner of the eye. And of course you can modify this look to your liking.

FOTD: Amazonite Dazzle

As shown in my Jill Stuart review of the eyeshadow palette #102, here is the look I made using that palette.
Sorry for my delay in posting this but I have been super busy! School has kept me busy, but I will be posting a few things tonight :D Also I had an awkward moment when I bumped into my ex yesterday. Apparently he works at the Game Stop I always go to. Way to ruin my day.

Anyways...onto the look!


Products Used
EYES

-ELF Eyelid Primer
-Jill Stuart 102 Amazonite Dazzle palette
-MUFE Aqua Eyes black liner
-Yanqina Volumizer mascara (I giving this a second chance, but I still get some mascara smudges!)
FACE AND LIPS
-Skin79 Oriental BB Cream
-Kat Von D Tattoo Concealer
-MAC Powder Blush in 'Eversun'
-Jack Black lip balm

How to Achieve this Look
1.Apply the shimmery blue-toned green on the entire lid, blending it above the crease.
2.Apply the satin brown above the crease and blend it in with the blue-toned green.
3.Apply the shimmery white on the inner corner, blending it upwards towards the crease.
4.Apply the shimmery olive green on the lower lash line.
5.Line the water liner and apply mascara.


I hope you guys enjoy the look :) Thank you for reading and commenting!

Tuesday, September 27, 2011

Review: Jill Stuart Jewel Crystal Eyes Palette in 102 Amazonite Dazzle

今晩は!(Konbanwa is the evening greeting :D)
Japanese is such a tough language, and I am currently starting my third year at my Uni, and I have been learning Japanese since my freshmen year. I love the language though, as well as the culture, literature, and food of course ^_^ Pronunciation is not that hard for me because I speak Spanish and the pronunciation is very similar, which the exception of "h", "r", and "j" sounds. Anyways, I digress. The point is the Jill Stuart is an extremely popular brand in Japan, and of course I just had to "research" it in order to know more of the Japanese culture (that is my cover up excuse anyways ^_~ I am really just a makeup addict). I purchased Jill Stuart's Jewel Crystal Eyes palette in #102 Amazonite Dazzle.

Photo from makeupandlife.com. I accidentally erased my picture of the unused eyeshadow >_<" And this is such a lovely picture~ :D

*This is a limited edition palette that was exclusive to only certain parts of Asia.I purchased it from YESSTYLE, but it is no longer available on the website. I am have no idea where else you might be able to purchase it.


Product Review
For the most part, all the Jill Stuart palettes are very shimmery and soft-colored, so I would suggest you stay away from these if you don't like shimmery eye shadows. This one in particular caught my eye because it contained darker colors  than the typical JS palette. I wanted to try at least one palette so I went for this one.
This does not contain any matte shades, but it does contain one shade that is not shimmery. Instead it has a satin-like finish. This is extremely rare for JS because Japanese eyeshadows tend to be very shimmery. I guess Japanese women like the bright eyed look, which then can achieve with shimmery shadows.
The shadows look gritty, but they are very soft. 102 Amazonite Dazzle is also very pigmented on its own, which honestly surprised me as I was expecting the colors to be very sheer.
The combination of the four colors is a little odd, but I love how they look together. The palette includes a iridescent lilac/white, a sparkling olive green,a darker blue/grey toned green, and a brown with red and green undertones. Yes very unique colors! The last two are my favorite colors in the quad because they are very unique.
Everything is topped off with the gorgeous, princess-like packaging. The four shadows come enclosed in the famous Jill Stuart compact, with a mirror and a sponge tip applicator. This LE palette is a little different because it has printed pictures on the cover of the compact.

Any negative aspects?
One obvious negative aspect about this, and really any Jill Stuart product, is both the cost and the availability. Jill Stuart is extremely expensive and very hard to find outside of Asia. The US has ONE counter in the entire country. Ridiculous. The palettes sell for about $50-$60. Yup, my wallet just cried.
I was lucky that I chose a palette I ended up really loving, especially since I had to buy it online and I really had no idea what the colors would be like. Imagine if I had payed that much for a something I did not absolutely love?? It would have sucked.
Another thing would be that you can get some shimmer fall out. Because the colors are very shimmery, there is a chance of getting some shimmers under the eye area.
Also, if you don't know how to work with these types of shadows, you won't be able to get a good color pay off. The best method is to apply the shadows with a flat shader brush, and then pat the color on the lid (instead of swiping it on).
One swipe of the colors
Even the white color is pretty! See that gorgeous lilac shimmer it has?

  Swatches of the four colors.One swipe only without any kind of base or primer.

Verdict
I really enjoy the colors because I personally love shimmer and sparkle. These are also darker and unique colors, which is completely my style! I am glad I was able to get my hands on this particular palette. That being said though, I don't know if I will purchase another JS palette. They are very expensive and I have yet to see another palette that catches my attention. Instead, I would like to try the Jill Stuart Eye Jelly in #9 and #10. I think I will save my money so I can try those out :D

Rating: 8/10 (-1 point for the price, -.5 for the fall out, -.5 for difficulty in finding)
Recommend? If you love shimmer, these are worth checking out.
Repurchase: It was LE so I cannot repurchase.

*FOTD coming up soon ;) Here is a teaser!

Monday, September 26, 2011

Sanrio FOTD: Keroppi

Hello ^_^
This is a continuation of my Sanrio series which is taking me a long time to complete!
The next on the list in Keroppi!~ Keroppi isn't one of my favorites, but he is a super cute little frog.
And just so you know, he was created in 1987.


I like the look I made, although it looks like an avant garde geisha look to me, lol! Here is my inspired look:


Products Used
-MAC 'Painterly' Paint Pot
-Coastal Scents 'Silk White' Gel Liner
-Wet N Wild 'I Dream of Greenie' trio
-Tarina Tarantino 'Candy Cameo' eyeshadow
-Coastal Scents 88 Palette (matte red eyeshadow)
-L'oreal Lineur Intense liquid liner
-MUFE Aqua Eyes black pencil liner 
-Prestige My Blackest Lashes mascara


How to Achieve this Look

  1.  Apply your primer/base to prevent creasing.
  2. Apply a piece of scotch tape on the edge of the eye to create a sharp line for the eyeshadow
  3. Take a crease brush and apply a lime green shade (I used the Eyelid color of the WnW trio) from the crease to just above the crease. Blend, blend, blend!
  4. Then, take a matte white eyeshadow (or in my case I used a white gel liner) and apply it on the lid. 
  5. Then, take a barbie pink shadow (I used Candy Cameo) and apply it on the outside part of the brown bone, just below the eyebrow.
  6. Take the same pink, and apply it on the inside part of the eye just below the eyebrow (Check pictures for reference).
  7. Take a matte white shadow and apply it in the space between the two places you applied the pink (the pink represents Keroppi's flushing cheeks).
  8. Using the lime green, apply it on the lower lash line. 
  9. If you want, you can also apply a matte red in the middle of the lower lash line (representing the red in his shirt).
  10. Apply liner on the water liner, liquid liner, and mascara.

 I was trying to make big eyes to imitate Keroppi's big eyes, but...it didn't really work. Haha.

 Products Used (Face)
-Skin79 Oriental BB Cream (both the bb cream and the cream blush)
-MAC Pink Swoon Blush
-MAC Saint Germain Lipstick

I have no idea why my lips look so puffy!
 This isn't a very wearable look, but these are inspired looks so I can afford to go a little more dramatic :D Hope you enjoy! Thank you so much for reading.

I am sorry if I haven't been commenting on blogs much. I have been very busy with school and I started working as a Reader for one of my professors. So besides posting, I haven't had much time for Blogger. But I will try my best to comment more often because I love reading blog posts ^_^


Sunday, September 25, 2011

EOTD: Splendid Frost

Check out my previous review of the Le Metier de Beaute Kaleidoscope in Splendid Frost~

Hello lovelies ♥
I wanted to post some simple looks with the Splendid Frost Kaleidoscope as soon as possible! My internet is  not fixed yet, so I will have to do what I can at my brother's apartment. I have been invading his space so hopefully he doesn't kick me out @_@

*These three looks were more of everyday looks for me. I will do a more dramatic look using this Kaleidoscope soon.
*I had the ELF eyelid primer in all the looks below.

First Look: Using The frosty blue on the lid, the peachy pink on the crease, and the matte gray on the lower lash line.


Second Look: Using all four colors.  The frosty blue on the lid, the cement gray on the crease topped by the pink peach also on the crease, and lastly the taupe color on the lower lash line.


 Third Look: Using the taupe shade from the kit on the lid. Then applying a matte light brown on the crease and a darker matte brown on the lower lash line.


I hope you enjoy these looks, although to be honest these were very rushed since I took the photos at 7:30 am before I went to class. That also means I only had about 5 minutes to do my entire makeup for the day so sorry for these crappier looks. 

Any suggestions for a eye look using these colors?

Video Game: Catherine

Hey there fellow geeks ;) I haven't done a game review before, and I haven't talked about video games in a long time. But I wanted to talk to you guys about this particular game because it is wonderfully weird.

Catherine is a Japanese game developed by Atlus for the PS3 and Xbox 360. It is a puzzle solving adventure game with some horror and adult themes thrown in. It is like nothing I have ever played before, and honestly it was both an interesting and frustrating game to play.

Cover art for the Xbox 360 version. with Katherine in the front. This is the one I played.
PS3 cover art with Catherine.

Before I get to a plot summary, I should mention that this game includes a lot of theatrical scenes, and it feels like you are watching a movie or a really screwed up drama. It is really cool because you get to sit back and enjoy the clips. I know some people won't like the amount of clips that are shown because they take up a big chunk of the game as a whole. I personally don't mind though, I actually enjoy it.

Plot Summary
The main character is Vincent, a 32 year old male who is in a long term relationship with his girlfriend Katherine, also 32 years old. Katherine is a strong willed women who wants a steady and normal life. She wants to get married and she is pressuring Vincent to marry her. Marriage and commitment scare Vincent, and he ponders and stresses out about his current situation. He begins to have nightmares shortly after.

He often goes drinking at the bar Stray Sheep. There, he meets a strangely beautiful woman named Catherine who he ends up spending that night with. After meeting Catherine, his nightmares become even worse.
During this time there is news of  men that are found dead in their apartments. They die in their sleep and have a look of anguish on their faces. It is said that they die in their dreams, and if you die in your dream you will die in real life.Vincent hears these rumors and he believes that his nightmares are related to these deaths somehow.

In his nightmares, Vincent has to get through puzzles to escape from being killed by creatures. The puzzle is pretty much climbing a stack of cubes, and you have to get all the way to the top (it is really hard to explain how the puzzle works but I will insert a picture below this paragraph). Creatures try to kill him and if he dies in the nightmare, he dies in real life. But in his nightmares he is not alone; he also sees other men, who to him look like sheep. It happens to be that  he recognizes some of the men (some which you will meet during the game). Once you beat the puzzle in the nightmare, you wake up. Vincent though, forgets most of the dream.
You see the stack of cubes? You pretty much have to pull and push the cubes in order to climb them all the way to the top. It is not as easy as it sounds, trust me. Especially not when you have a creepy creature trying to kill you along the way up.

Meanwhile, when he wakes up Catherine is usually in his bed. Vincent begins to freak out because he is cheating on his girlfriend and he can't seem to remember how Catherine ends up in his bed.
Vincent finds out that Katherine is pregnant with his child and things start to get harder for Vincent. He doesn't want Katherine to find out he is cheating on her, but he can't seem to break things up with Catherine. Catherine doesn't know Vincent already has a girlfriend, and Catherine says if he cheats on her, that she will die or kill him instead. Vincent is also strangely allured to Catherine, and he doesn't seem to know why.

When Vincent is not in the nightmares, he is usually drinking with his buddies at the Stray Sheep. There, you can decided to drink some alcoholic beverages (and you get to learn trivia and history of the beverages you drink xD ), speak to other people, text message both Katherine and Catherine, and play the arcade game Rapunzel.
The Rapunzel arcade game

All of the things you do affect the outcome of the ending. There is a total of 8 possible endings; 3 scenarios in which Vincent decides to be with Katherine, 3 scenarios where he decides to be with Catherine, and 2 where he chooses neither of the two women. All I will say is that I got the a happy ending with Katherine as my ending. I don't want to give away what happens in the end! You should all definitely play the game!
(Just a little hint and something to think about: Why is the game titled after Catherine, and not Katherine?)

My thoughts on the Game

I really enjoyed playing this game because...
-I wanted to know who was behind the deaths, so it felt like a detective game (Sherlock Holmes style!)
-I like the fact that there are different ending depending on what you chose to do in the game
-The nightmare realm is really creepy sometimes, and I love horror games
-The story plot left me on the edge of my seat the entire time. Would he get caught cheating? Who would die next? Who is behind the deaths? And who the hell is Catherine??? (She was a crazy psycho)
-Very interesting alcohol trivia xD
-You get to  play a game within a game (Vincent has to play an arcade game named Rapunzel)


What I disliked about the game...
-The puzzles in the nightmare realm were soooo hard sometimes. I swear a couple took me forever to beat. May people have complained about the difficulty of this game, and I can see why. I had the mode on "Normal" and it was sooo difficult. But there is a Super Easy mode that was created because so many people complained.

Overall
I think this was such a great game and I thoroughly enjoyed playing it. You won't find anything else like it. It is puzzle solving, horror, mystery, drama, and love mixed into one game!  Maybe you should include frustration and cursing there too, since I would get so angry when I couldn't beat a puzzle xD Kudos to the makers of the game. They really went outside the box, and made a game that really stands out. I can confidently say that this is one of the games that has stood out the most this year!
Rating: 8.5/10
Recommend? Definitely! A must play for all gamers, and play worthy for those who occasionally play video games.

Saturday, September 24, 2011

EOTD: Space Odyssey

Before anything I want to thank all of you for entering my last giveaway~ I have contacted the winners and I am waiting for their responses. Once I hear back from all three, I will make a post on the giveaway winners~
Secondly, I want to thank you all because I have reached 500 followers! That is freaking insane. You are all amazing for making that possible :D And hey I might have a small giveaway soon :D

Anyways, to celebrate I have this a look using only eyeshadows from the urban Decay 15th Anniversary Palette~ It reminds me of future space travel for some reason...but I really love this look. I have already worn it a couple times.


Products Used
~ELF Eyelid Primer
~UD 15 Anniversary Palette (Ace, Omen, and Blackout)
~Urban Decay 24/7 pencil liner in 'Lust'
~L'oreal Lineur Intense liquid liner
~Prestige My Blackest Lashes mascara

How to Achieve this Look

1.Apply your primer/base.
2.Apply Ace (shimmery charcoal silver) on the lid with a flat shader brush.
3.Using a fluffly blending brush (MAC 217), apply Omen (iridescent purple) on the inner half of the crease.
4.Make sure to apply Omen on the inner corner as well.
5.Take Blackout (matte black) with the same blending brush, and apply it on the outer V.
6.Blend the Blackout into Ace for a better transition of color.
7. Take a purple liner, I used Urban Decay pencil liner in Lust, and apply it on the water liner. You can use a black liner if you prefer.
8.Apply Ace on the lower lash line.
9.Apply liquid liner and mascara.


More Pictures...


What do you think? Do you want to go on a Space Odyssey? Or maybe you can just sport this as a night time look ^_~


Thursday, September 22, 2011

Fail MAC Haul + Update

Although it has only been like three days or so since my last actual post, it seems forever since I blogged! I miss it so much! Unfortunately my internet has not been fixed and I am currently at my brother's place stealing his internet ^_^

If you remember, I was on Project 10 Pan #2 since I finished my first 10 products about two weeks ago. And sadly I have already failed! I went shopping for presents for my friend's birthday and I could not resist buying a couple of things for myself. Iwill show you what I purchased~

*These are all MAC products that were purchased with my own money.

1.Fresh Amour Mattene Lipstick ($14.50, Limited Edition)
This was the only thing I purchased from the Posh Paradise collection, mostly because all the paint pots were sold out. I thought that these mattene lipsticks were going to be permanent, but they are not. I am totally obsessed with purple lippies, so I HAD to buy this. This is a matte, but not dry, very pale and opaque lavender.
Fresh Amour


2. Blue Sheen & Smokey Ruby Mineralize Eyeshadow ($20, Limited Edition)
When the Semi-precious collection came out, nothing really appealed to me, that is until I kept seeing these shadows in a bunch of blogs. By the time I decided to buy something, Smoked Ruby sold out online. Lucky for me that one of my counters had these two colors! I had to have Smoked Ruby and Blue Sheen was also too pretty to resist! I know Blue Sheen is still available online, in case you are curious.
Blue Sheen is a deep blue with multi-colored shimmers.
Smoked Ruby is a blacked copper toned red.
Blue Sheen

Smoked Ruby


3.Asian Flower & Korean Candy Sheen Supreme Lipsticks ($14.50, Permanent)
Although the Seasonally Supreme collection is permanent, I could not resist the look of these. Since I had already failed my P10P, I might as well go wild.So what the heck, I bought these too.
Asian Flower is a pink toned purple with silver shimmers.
Korean Candy is a bright, orange toned red.
Both are super creamy, moisturizing, and opaque.
Koren Candy  /  Asian Flower
Asian Flower

Korean Candy
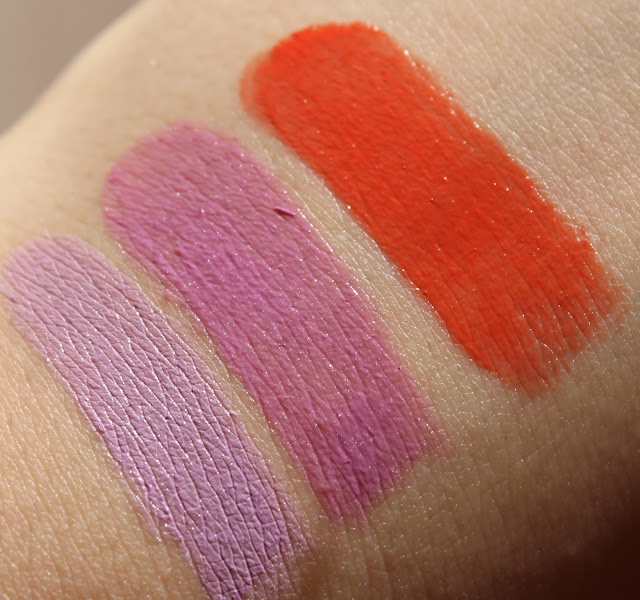
Swatches
Korean Candy is absolutely stunning! I will be doing lip swatches once my internet is fixed~
Fresh Amour  /  Asian Flower  /  Korean Candy
Blue Sheen. Left: alone, Right: Blue Sheen over Pixie Epoxy
Smoked Ruby. Left: Alone, Right: Smoked Ruby over Pixie Epoxy.
 Both of the eyeshadows are very pigmented on their own, but Pixie Epoxy makes it even more vibrant.

Update~
I have already chosen the 3 winners for my giveaway and I am waiting for their responses. :D
I also have a lot of things that I need to post once I get my internet. Check the side bar for upcoming posts~

Thank you all so much for reading! I hope you are all doing well and I can't wait to start reading your blogs again!